Resetting Network Settings on iPhone: Easy Guide
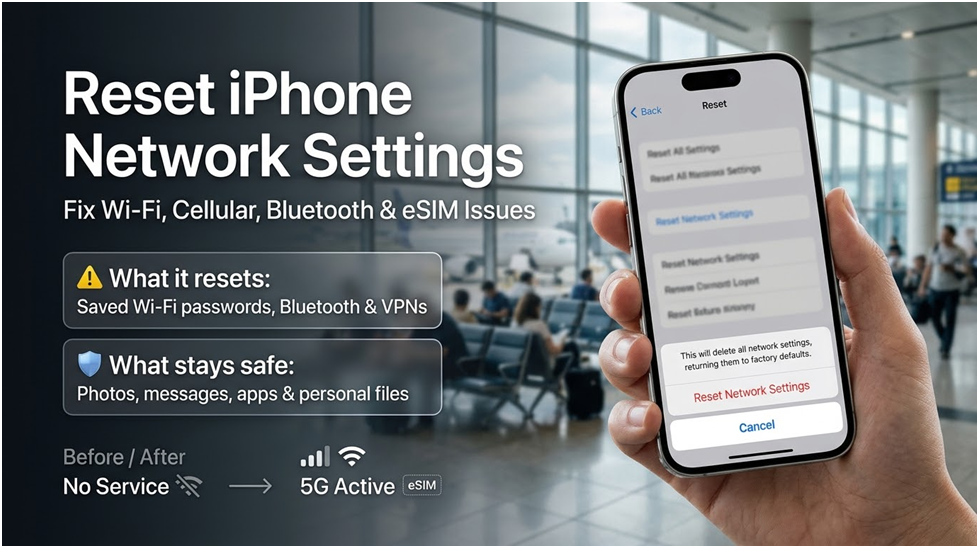
Resetting the network settings on an iPhone is a straightforward solution that frequently resolves annoying network-related problems. This comprehensive article will show you how to reset network settings on any iPhone, what it does, what gets erased, and how to troubleshoot further if necessary, regardless of whether you’re having Wi-Fi disconnections, poor mobile data, Bluetooth pairing issues, or VPN misbehaviour.
When you turn on your iPhone after landing at JFK, “No Service” appears in the upper corner. Aeroplane Mode is toggled. Nothing takes place. Your phone won’t connect to the local network even though you require a data connection to order an Uber. Start there if the problem is a more general network unavailability issue overseas.
Resetting your network settings is the quickest approach to make your iPhone find a signal when it can’t connect overseas. Here’s how to identify the issue, restart your handset, and restore your connection without incurring hefty roaming costs. See our guide to network issues overseas for the complete picture.
What Causes This Issue?
When your iPhone has trouble switching between carriers, a network failure occurs. Your phone must abandon its home carrier and engage in a digital handshake with a foreign partner network when you travel across a border. This handoff is often unsuccessful.
For your iPhone to connect to the mobile web, APN (Access Point Name) settings are necessary. Consider the APN a safe conduit that connects your device to the internet. The foreign network rejects your connection if your iPhone caches faulty carrier data or retains an out-of-date APN. The status bar may display 5G, but no websites will load.
Abrupt signal dropouts can also be caused by hardware problems. Over time, physical SIM cards deteriorate. The card moves within the tray, or the gold contacts are damaged. You immediately lose service if your phone is unable to read the chip. To determine physical damage, see our guide on damaged SIM cards.
In other situations, the contents of the tray are simply not recognised by the iOS program. Refer to our troubleshooting instructions for resolving a phone that displays “No SIM Available” if you get a specific alert on your screen about a missing chip.
Fast Fix (80% of Cases Solved)
By clearing away faulty caches and forcing your iPhone to download new carrier reset configurations, you can reset your network settings. It takes less than two minutes to complete this process.
The precise steps for iOS are as follows:
- On your iPhone, launch the Settings app.
- Press General.
- Tap Transfer or Reset iPhone after scrolling to the bottom.
- Press Reset.
- Choose “Reset Network Settings.”
- After entering your passcode, click “Confirm.”
Your iPhone will resume right away.
What Is the Fate of Your Data?
All stored Bluetooth pairings, VPN setups, and Wi-Fi passwords are erased by this reset. You must re-enter your hotel Wi-Fi password and reconnect your Apple Watch.
What Remains Secure?
Your messages, apps, photographs, and Safari tabs are all left intact. A factory reset is not what a hard reset is.
Your phone will look for the closest cell tower when it reboots. This restores your cellular data in 80% of cases.
Sometimes, though, the network connects, but you are still unable to access the internet. Refer to our advice on controlling app data consumption overseas if your browser functions properly but your apps remain offline.
Cutting-Edge Solutions
If the reset is unsuccessful and “SOS” or “No Service” is still displayed on your iPhone, you should examine your cellular settings more thoroughly.
1. Make a Manual Network Selection
Your iPhone chooses a local carrier by default. It occasionally selects a dead or congested network.
- Navigate to Network Selection under Settings > Cellular.
- Disable Automatic.
- The list of local carriers will appear after 30 seconds.
- From the list, tap a different network.
2. Verify Data Roaming
Roaming must be enabled if you are attempting to use your home plan while overseas.
- Navigate to Cellular > Cellular Data Options in Settings.
- Ensure Data Roaming is enabled.
3. Manual eSIM Installation Troubleshooting
You may experience installation issues if you purchased a local eSIM from a different supplier. Many conventional suppliers need you to manually enter a lengthy server address or scan a QR code. The eSIM cannot connect to the network if the incorrect code is pasted.
Find out how to fix this specific SM-DP+ address problem.
4. Examine Your Roaming Fees
A functioning connection comes with a hefty charge if you depend on your home carrier overseas. Just using your domestic data allotment might cost you up to $15 per day with AT&T and Verizon.
Avoidance
At the airport, a calm traveller is using a smartphone to prepare their eSIM plan.
Give up battling standard roaming fees and network settings. Connectivity problems are resolved up front with a GoMoWorld eSIM.
For calls and texts, you keep your physical SIM card at home active. GoMoWorld provides you with a dedicated, fast data connection. This configuration ensures that you remain connected without incurring daily overage penalties from your home provider. GoMoWorld is limited to data.
The GoMoWorld app is where everything takes place. You select your destination, purchase a plan, then download the app for iOS or Android.
QR codes are never used by GoMoWorld. The entire installation process is managed by the app on your device. You purchase your plan now, and until you activate it, it never expires. The activation is entirely under your control. When you land, tap “Start” in the app. There are no unexpected fees because there is no auto-activation.
Prices are transparent and set. You can get 3GB for seven days for €3.99, 10GB for fifteen days at €10.99, or 25GB for thirty days at €19.99. Every plan has hotspot capabilities.
GoMoWorld does not charge overage fees because it operates on a prepaid scheme. The connection ends when your data runs out. To get back online, you just purchase a different plan.
You completely avoid traditional call fees when you have a strong data connection. Use your data allotment for everyday communication and save your home line for emergencies. Learn more about using WhatsApp overseas.
Organise your data before you travel to avoid network issues on your next trip.
In Conclusion: A Secure and Efficient Solution
Resetting your iPhone’s network settings is an effective and secure troubleshooting technique that can fix a variety of connectivity problems. It’s an effective way to restore optimal network performance without jeopardising your personal data, even though some settings will be lost.
Save this page to your bookmarks and forward it to others who are having network issues with their iPhones. For a more seamless mobile experience, update your iOS on a regular basis and keep backups.
FAQ
Why Should I Reset Network Settings on an iPhone?
When your iPhone drops Wi-Fi signals, won’t pair with Bluetooth devices, or can’t connect to cellular data, you have to reset the network settings. It forces the device to erase outdated caches and download fresh configuration data from the nearby cell towers.
When You Reset the Network Settings, What Happens?
All stored Bluetooth pairings, VPN setups, and Wi-Fi passwords are erased. It returns your phone’s settings to their original state. Your private information is not erased, including chats, apps, and pictures.
How Do I Reset My iPhone’s Network?
- Launch the Settings application.
- Press General.
- Tap Transfer or Reset iPhone after scrolling down.
- Tap Reset, then select Reset Network Settings.
- Enter your passcode to confirm and wait for the device to restart.
Does Changing Network Settings Remove Everything?
No. A network reset of an iPhone solely impacts your connectivity configurations. It does not remove your local files, contacts, or app data. After the reboot, all you’ll need to do is reconnect to your Bluetooth devices and Wi-Fi networks.

Understanding and Preventing Computer Overheating: The Ultimate Guide
How to Fix Printer Offline: Complete Guide

Unlocking the Mystery: What Does GPU Do
About Author
